BBQ recipes by John Dawson
All-Purpose BBQ Seasoning
http://www.patiodaddiobbq.com/2009/02/all-purpose-bbq-seasoning.html
2/7/09 - John Dawson Permanent Link 
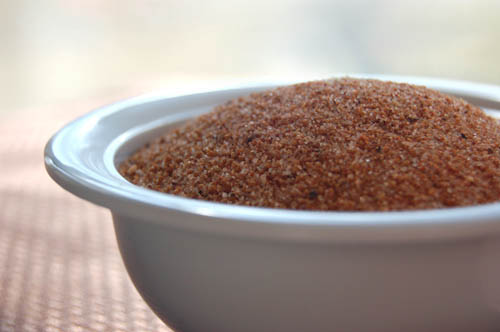
This is for those of you who need or want a great basic all-around barbeque seasoning (or "rub"). This is also a great base recipe for creating your own signature seasoning.
This recipe is very close to what I use in competition cooking. I've left out a few (very few) "secret ingredients" so that I can maintain a competitive edge. Take it and make it your own.
When I say that this is "all-purpose", I mean it. This rub works well on every kind of meat, and even vegetables or popcorn.
It's key to remember that any seasoning is only as good as its ingredients. Quality fresh ingredients are what separates a great rub from the pack. Buy the best you can find and you will be amazed at the difference. For outstanding spices I strongly recommend World Spice Merchants.
Ingredients
1 c Sea salt, medium fine (no table salt, please)
1/2 c Unrefined evaporated cane sugar (no table sugar, please)
1/2 c Dark brown sugar, dried (instructions below)
2 Tbs Sweet Hungarian paprika (the real deal, please)
2 Tbs Chili powder (Spice Islands is a good store-bought brand)
2 Tbs Granulated onion (not onion "powder")
2 Tbs Dry mustard (I prefer Colman's)
1 Tbs Granulated garlic (not garlic "powder")
2 tsp Black pepper, ground fresh (I use a separate coffee grinder for spices)
2 tsp Celery salt
2 tsp Ground ginger
1 tsp Ground cayenne
Method
Preheat your oven to 170°.
Pour the sea salt and dark brown sugar on a large sheet pan, mix well, and spread the mixture evenly over the entire pan.
Bake the salt/sugar mixture 60 minutes, or until the sugar is very dry.
Notes: Drying the sugar prevents clumping and ensures an even distribution in the final product. Drying it with the salt helps prevent the sugar from becoming a solid sheet. It's happened to me, and it's bad. That's how I developed this method.
Combine the remaining ingredients in a large mixing bowl.
When the sugar is dry, remove the pan from the oven and let cool. Once cool, grind the mixture well in the pan by rolling it with a rolling pin. Do this several times in alternating directions.
Sift the salt/sugar mixture into the mixing bowl. I use a fine mesh strainer and a pestle to break it up further. Toss out any rock-like clumps.
Mix all the ingredients very well (I use a large whisk) and store in an airtight container.
Labels: recipe
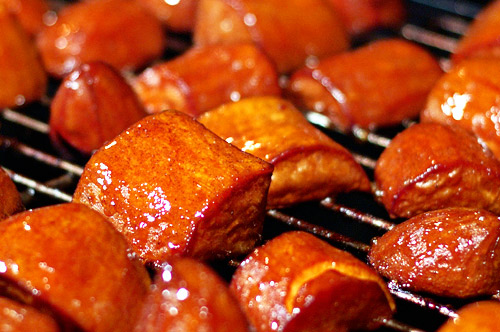
Barbecued Sweet Potatoes
http://www.patiodaddiobbq.com/2009/11/barbecued-sweet-potatoes.html
11/8/09 - John Dawson Permanent Link
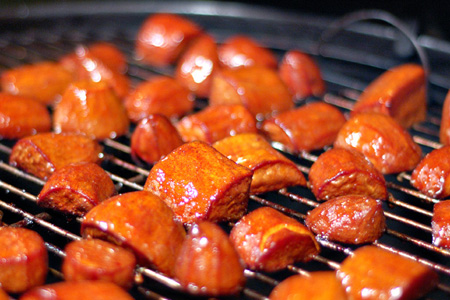
Here is a great simple side dish to accompany barbecue or just about any rustic meal. The smokey flavor helps to cut the natural sweetness a little while adding a unique dimension to the flavor.
Although the ingredient is listed as "yams", they are actually sweet potatoes. I am simply using the grocery store name to avoid any confusion. Why they insist on calling them yams is beyond me, since the two aren't even distant botanical cousins.
I served this with grilled top sirloin and made extra for a little experiment that I'll be blogging about soon.
Ingredients
4 med Garnet "yams", peeled and cut into 2" pieces
1/4 cup Canola oil
1/4 cup Granulated sugar
2 Tbsp Kosher salt
2 tsp Black pepper, divided
1 tsp Pumpkin pie spice
Glaze
1/4 cup Maple syrup (the real deal, please)
2 Tbsp Orange juice concentrate, thawed
1/8 tsp Ground cayenne pepper
Method
Mix the sugar, pumpkin pie spice and half the black pepper in a small bowl.
Add the oil, salt and the remaining black pepper to a gallon size zip-top bag, seal, and slosh to combine.
Add the yams to the bag, remove the excess air, seal and leave at room temperature for an hour or two.
Start your fire and prepare for indirect cooking at 275º.
Add one small chunk of fruit wood (apple or cherry) to the fire about 10 minutes before you're ready to cook. Wood chips soaked for 30-60 minutes will work well, too. If you're using a gas grill, make a small smoker pouch.
Drain as much of the oil from the bag as you can, add the sugar mixture, re-seal and shake the bag to coat the yams as evenly as possible.
Arrange the yams in a single layer on your cooking grate and cook indirect for 20 minutes.
While the yams are cooking, mix the glaze in a small bowl.
Glaze the top of each piece of yam, turn each over and cook another 20 minutes.
Glaze and turn each piece again, and cook another 10 minutes.
Remove the yams to a serving bowl, drizzle lightly with the glaze and toss very gently.
Serve and enjoy!
General's Grilled Chicken
http://www.patiodaddiobbq.com/2009/04/generals-grilled-chicken.html
4/24/09 - John Dawson Permanent Link
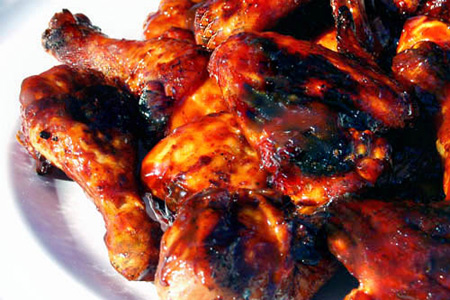
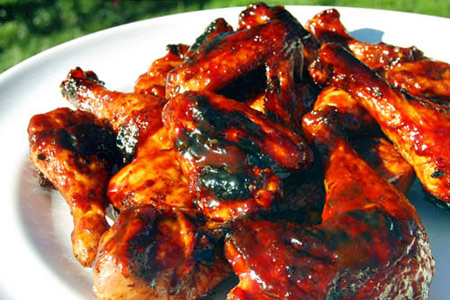
If you've ever had General Tso's Chicken at your favorite Chinese restaurant, you will completely understand this twist on grilled chicken. If you've never tried General's Chicken (as it's commonly referred to), and you like sweet, sticky and spicy Asian sauces, give this a try.
The idea for the dry seasoning came from a co-worker who uses it on her roasted chicken. She brought me a packet of the seasoning and this is what I came up with. Thanks, Beverly!
As always, click the image to see the larger version.
Ingredients
1 whole chicken, cut up
1 packet Sunbird Phad Thai seasoning (Asian section of your supermarket)
2 Tbsp Lawry's Seasoned Salt
Sauce
1/2 cup Hoisin sauce (I prefer Lee Kum Kee brand)
1/4 cup Ketchup (Heinz, of course)
1/8 cup Mae Ploy sweet chili sauce (Asian section of your supermarket)
1/8 cup Rice wine vinegar
1 Tbsp Lemon juice
2 tsp Hot chile oil (or more to taste -- I prefer Mongolian Fire Oil)
Method
Rinse all of the chicken pieces well under running cold water and pat dry with paper towels.
Coat all sides of each piece of chicken liberally with the Phad Thai seasoning and a sprinkle of the seasoned salt.
Put all the chicken in a gallon zip-top bag and refrigerate for at least two hours.
Combine all the sauce ingredients in a medium mixing bowl, whisk well to combine, and set aside.
Start your fire and prepare for indirect cooking at medium-high heat.
Grill the chicken indirect until the thighs reach an internal temperature of 155º.
Note: Keep the largest pieces of dark meat closest to the heat, and the white meat furthest away.
Brush a medium-thick coat of the sauce on each piece of chicken.
Continue cooking until the thickest part of the largest dark meat reaches 165º. Rotate the pieces close to the direct part of the fire until the sauce caramelizes nicely, then rotate them back to the cooler part of the grill.
Brush each piece of chicken with another medium-thick coat of the sauce, and remove to a platter.
Let the chicken rest 10 minutes.
Serve and enjoy.
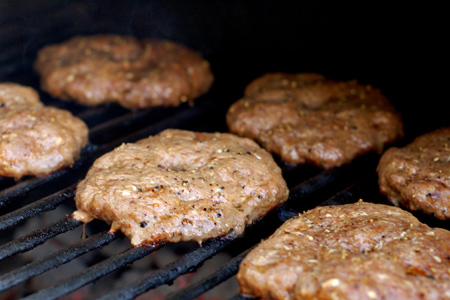
Western BBQ Burgers
http://www.patiodaddiobbq.com/2010/05/western-bbq-burgers.html
5/8/10 - John Dawson Permanent Link
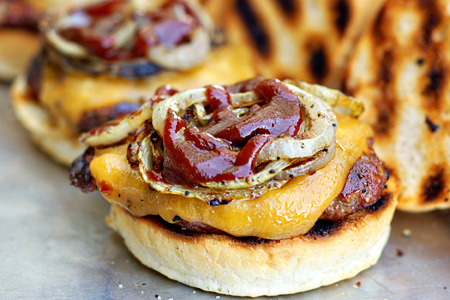
There are few things in life that are better than a great burger. OK, maybe there are more than a few, but it really can't be all that many. This is especially true when you top the burger with a slice of cheddar, some grilled onions (as in actually on the grill), and some tangy BBQ sauce. We're talkin' about some serious USDA grade-A all-American fire-grilled good eats!
Let's break it down!
Ingredients
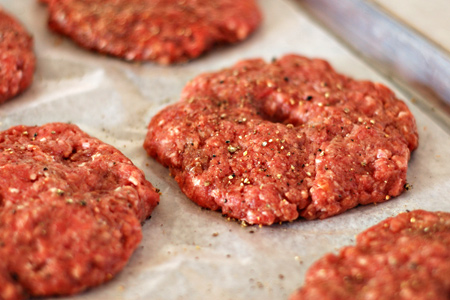
3 lbs Ground beef, 80/20
6 Buns
6 slices Medium cheddar cheese
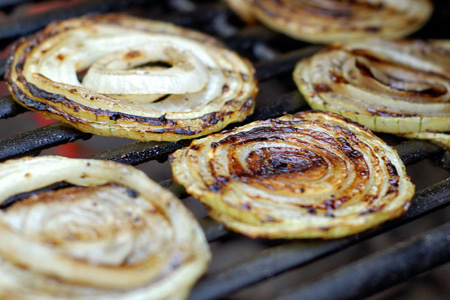
1 large Sweet onion, sliced to 1/3" (six slices)
1/4 cup Water, ice cold
1 1/2 Tbsp Your favorite BBQ rub (or 2 tsp seasoned salt)
2 Tbsp Soy sauce
6 Tbsp Your favorite BBQ sauce
Kosher salt
Black pepper
Canola or vegetable oil
Method
Put the beef, BBQ seasoning, soy sauce and water in a large mixing bowl.
Use your hands to mix the ingredients very well. Yes, it's messy.
Divide the meat into six equal portions and form them into evenly-sized patties 1/2" thick patties (about six inches in diameter).
Sprinkle both sides of each patty with pepper.
Use your index finger to put a hole in the center of each patty and set them aside.
Season both sides of each onion slice lightly with salt and pepper, being careful to leave the rings intact.
Lightly oil both side of each onion slice.
Start your grill and prepare for direct and indirect cooking (heat to one side) over a medium-hot fire (375-400º).
Grill the onions over direct heat for about two minutes per side, then move them to the cooler side of the grill.
Lightly oil both sides of each burger.
Grill the burgers over direct heat for three minutes.
Flip the burgers and cook them another three minutes.
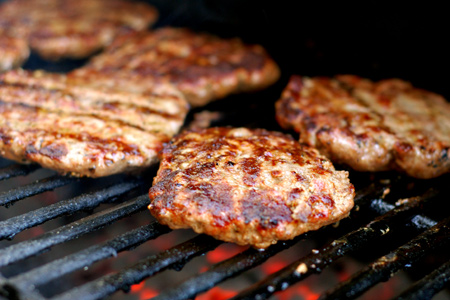
Move the burgers to the cooler side of the grill and top each with a slice of cheese and a grilled onion slice.
Toast the buns over direct heat.
Top each burger with a healthy drizzle of barbecue sauce.
Serve and enjoy!
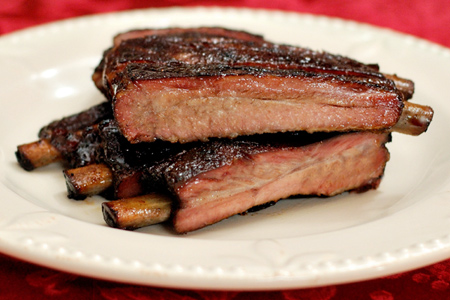
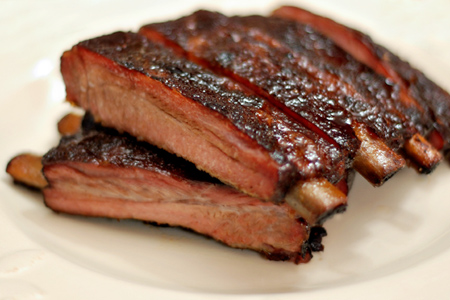
Alll-Purpose BBQ Seasoning
http://www.patiodaddiobbq.com/2011/11/ultimate-rib-glaze.html
11/5/11 - John Dawson Permanent Link
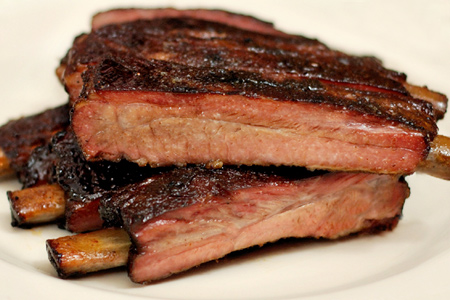
This glaze is outstanding for adding a sweet and glossy finish to your ribs. It's almost neutral in flavor so that it will nicely compliment the flavor and color of almost any rib rub.
Barbecued ribs are typically served one of two ways -- wet (sauced), or dry (rub only). I like mine either way, but I don't often serve mine dry. Last weekend the girlies wanted ribs, and I wanted to use up some of my leftover Memphis dry rub, so I used it on three slabs of St. Louis-style spare ribs. The rub was great, but I felt that the ribs looked dull and that they needed a bit of sweetness and tang to compliment the rub. I wanted to add something that would bridge the gap between wet and dry ribs, thus the genesis of this glaze.
This isn't just for ribs. It would work very well on almost any barbecued meat.
Caution: As with any finishing glaze, you need to add this during the last few minutes of cooking and watch it closely. You want it to barely caramelize and not burn.
Ingredients
2 1/2 cups Demerara sugar, or any raw sugar
1 1/2 cups Water
1/2 cup Red wine vinegar
2 Tbsp Worcestershire sauce
1 tsp Sweet paprika
1/4 tsp Chinese five spice
1/4 tsp Smoked paprika
1/4 tsp Ground cayenne
1/4 tsp Nutmeg
Method
Combine all of the ingredients in a medium sauce pan.
Bring to a slight boil over medium heat, stirring frequently until all of the sugar is dissolved.
Remove from the heat, set aside, and let cool.
Brush or drizzle on the ribs during the last few minutes of cooking.
Add additional coats as you like.
You can refrigerate the remaining glaze for up to two weeks.
No comments:
Post a Comment